
How to Organize Garden Seeds: A Simple 2026 Guide
Table of Contents
- How to Organize Garden Seeds: Start With the Right Containers
- Sorting Your Seed Stash: Alphabetical, Plant Type, or Planting Date
- The Binder Method vs. the Photo Case Method
- How to Label Seed Packets So You Never Lose Track
- How to Store Vegetable Seeds Long Term Without Losing Germination
- Building a Seed Inventory Tracker That Actually Works
- Managing Bulk Seeds and Large Collections
- Conclusion: Your Seed Collection, Ready for Every Season
- Frequently Asked Questions
Last Updated: October 4, 2026
How to Organize Garden Seeds: Start With the Right Containers
Learning how to organize garden seeds starts with one decision: what you store them in. Get that right, and everything else gets easier.
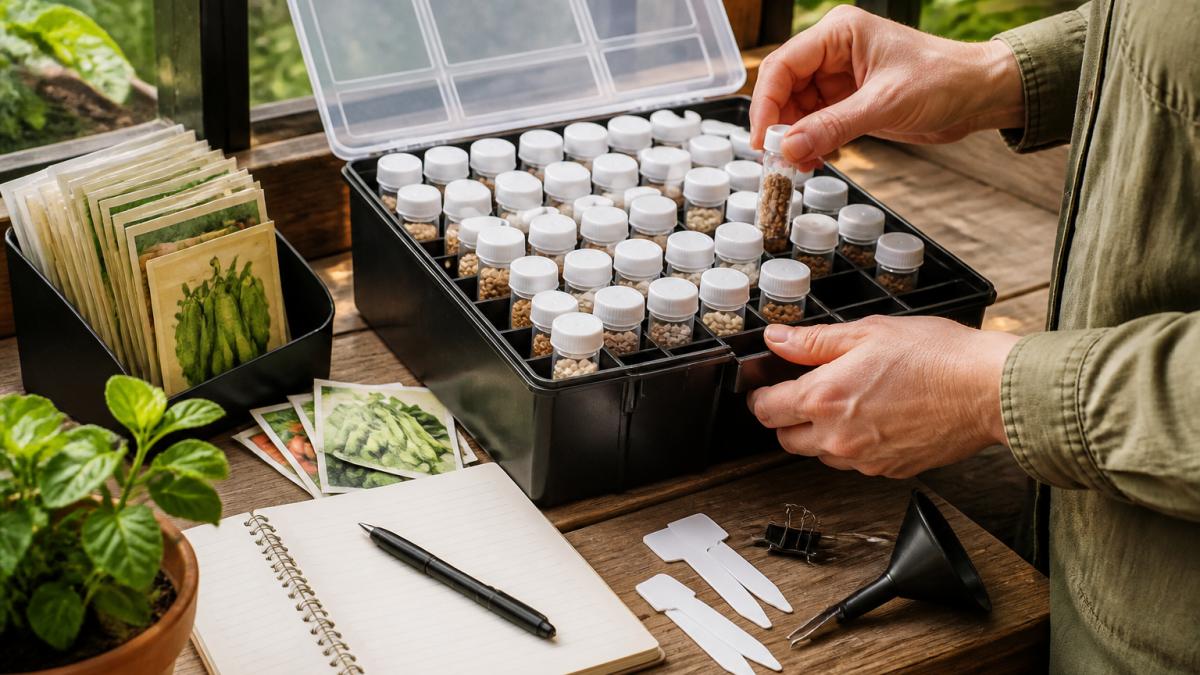
The core problem is moisture and light. Seeds lose germination rate when they sit in damp, warm, bright places. So the container matters more than the sorting method. A sealed jar beats a paper envelope every time.
We built the WALERICA Seed Storage Organizer Kit around this exact problem. It holds up to 120 individual seed vials in one water-resistant box, so your whole collection stays sealed, labeled, and reachable.

Here's what to look for in any container:
- A tight seal. Loose lids let humid air in.
- Opaque or dark material. Light degrades seeds over time.
- Individual compartments. One big bin means one big mess.
- A carry handle. You'll move it from shelf to garden bed.
Sorting Your Seed Stash: Alphabetical, Plant Type, or Planting Date
Pick your sorting method before you touch a single packet. The right one depends on how you actually plant.
Alphabetical sorting works best for large collections with many heirloom varieties. You find any packet in seconds.
Plant type sorting groups annuals, perennials, vegetables, and herbs together. This suits gardeners who plant by category.
Planting date sorting organizes by seed starting calendar and last frost date. It's the most practical for growers who start indoors.
| Sorting Method | Best For | Main Drawback |
|---|---|---|
| Alphabetical | Large collections, many varieties | No seasonal cue |
| Plant type | Mixed annuals and perennials | Slow to find one packet |
| Planting date | Indoor seed starting | Breaks down with new additions |
Many gardeners use a hybrid: alphabetical within plant-type groups. That gives you fast lookup and a rough seasonal cue.
The Binder Method vs. the Photo Case Method
Two physical systems dominate seed storage, and they solve different problems.
The binder method uses a three-ring binder with plastic sleeves. Each sleeve holds one seed packet. It's cheap, flat, and easy to flip through.
The photo case method uses a hard case with individual compartments, like a photo storage case. Each slot holds a vial or packet. It seals, stacks, and travels well. This is the approach we favor.
The binder wins on cost and space. The photo case wins on protection. If you're storing seeds for more than one season, protection matters more.
How to Label Seed Packets So You Never Lose Track
A label without the right details is just a name. Good labels carry four things:
- Variety name (be specific, not just "tomato")
- Purchase date or save date
- Germination rate, if known
- Source (seed catalog, trade, or saved)
Write these on the vial or packet, not on a separate card you'll lose. Our kit includes labels and a notebook for exactly this reason.
How to Store Vegetable Seeds Long Term Without Losing Germination
The ideal storage conditions are simple to state and easy to get wrong: cool, dark, and dry. What separates a collection that still germinates in five years from one that fizzles in two is how precisely you control the dry part.
The two numbers that matter
Seed viability tracks two variables: temperature and relative humidity. A sealed jar in a cool basement can outperform a paper envelope in a warm kitchen for seed storage.
For home storage, aim for cool temperatures and low humidity inside the container.
Desiccants: what to use and how much
A desiccant absorbs the moisture that sneaks in every time you open the container. Silica gel is the standard choice because it is reusable and easy to recharge.
- Silica gel packets. Use silica gel packets as needed.
- Recharging. Recharge silica gel packets when they indicate saturation.
- Alternatives. Dry powdered milk in a paper towel works in a pinch but saturates fast. Clay desiccants (montmorillonite) hold more moisture per gram than silica but recharge at higher heat.
Vacuum sealing for multi-year storage
For seed you will not touch for two or more years, vacuum sealing removes the air, and the moisture and oxygen in it, that drive deterioration.
- Mylar bags with oxygen absorbers. Mylar bags with oxygen absorbers can be used for multi-year storage.
- Vacuum sealers. A standard kitchen vacuum sealer can be used for short and medium terms.
- Do not vacuum seal damp seed. Dry first, then seal.
Drying seed before storage
For seed you saved yourself, drying is the step that decides whether the rest of the system works.
- Air-dry first. Spread seed in a single layer on a screen or paper plate in a warm, well-ventilated, out-of-sun spot for 1-2 weeks. Stir daily.
- Test for dryness. Test seeds for dryness before storage.
- Skip the oven. If you need faster drying, use a food dehydrator on its lowest setting with the door cracked.
Light, pests, and the container
Light degrades seed through oxidation, so an opaque container is not optional for long-term storage. Pests are the other silent killer: pantry moths and beetles chew through paper packets and lay eggs in seed. A sealed glass or hard plastic container with a gasket stops them. If you find pests in a batch, consider freezing the seed to kill eggs and larvae.
A realistic shelf-life reference
Different seed varieties have varying shelf lives when properly stored.
WALERICA Seed Storage Organizer Kit with 120 Seed Containers – Seed Organizer →
For deeper guidance on storage and germination standards, see the USDA ARS seed and germplasm resources.
Building a Seed Inventory Tracker That Actually Works
A seed inventory tracker is a written or digital record of every variety you own, with quantity and age. It's the single best defense against buying duplicates and letting old seeds expire.
Digital inventory management is where most hobbyist guides stop short. A simple spreadsheet beats a paper list because you can sort, search, and flag old stock.
Track these columns:
- Variety name and type
- Year purchased or saved
- Quantity remaining
- Storage location
- Notes (germination results, flavor, yield)
Managing Bulk Seeds and Large Collections
Bulk seed management breaks every small-scale system. When you are dealing with pounds of one variety, a hundred packets from a seed swap, or your own harvest from a dozen tomato plants, individual vials stop scaling. Most guides skip this entirely because they assume a shoebox-sized collection. Here is how to run a bulk operation without losing track of what you have.
Split bulk stock from working stock
The single most useful habit is to keep two tiers of storage:
- Working stock. Small vials or envelopes you actually plant from, kept in your everyday organizer. Refill these from bulk as needed.
- Bulk stock. The main quantity, sealed in larger containers and stored cool and dark, opened as rarely as possible.
Every time you open bulk stock, you expose the whole lot to humidity. Refilling a small vial from a large jar once a season is fine. Dipping into the bulk jar every weekend is not.
Lot numbering: the backbone of bulk tracking
Assign every bulk lot a unique ID the day it enters storage. A simple format works:
[variety code]-[year]-[source code]-[sequence]
For example, TOM-BRANDY-2026-SS-01 tells you it is Brandywine tomato, saved or bought in 2026, from Seed Savers, first lot of the year. Write the lot number on the bulk container, on every working vial drawn from it, and in your inventory tracker. When germination drops, you can trace the problem back to a specific lot instead of guessing.
Germination testing for bulk lots
You cannot test every seed, but you can sample. A standard home test:
- Count out a sample of seeds from the lot.
- Place them on a damp paper towel, fold, and seal in a plastic bag.
- Keep them in appropriate conditions for 7-14 days, checking moisture.
- Count how many sprout to determine germination.
Run this before you commit a bulk lot to a full season. If germination is low, consider planting thicker or replacing the lot. Log the result against the lot number so next year's decision is data-driven, not a guess.
Containers that scale
- Half-gallon to gallon glass jars with gasketed lids for quantities up to a few pounds. Add a silica packet sized to the headspace.
- Food-grade buckets with gamma-seal lids for pounds of beans, corn, or peas. Line with a Mylar bag for multi-year storage.
- Mylar bags with oxygen absorbers for anything you will not open for two or more years.
Label the outside of every bulk container with variety, lot number, year, and weight. A label that only says "beans" is a future mystery.
Cross-pollination and isolation
If you save your own seed, watch for cross-pollination between varieties. It will not hurt storage, but it changes what grows next year, and in bulk, a single contaminated lot can wipe out a variety you were counting on. Isolation distances vary by species: tomatoes self-pollinate and need only a few feet, while squash, brassicas, and corn cross readily and may need a quarter mile or a physical barrier. The Seed Savers Exchange guide to isolation distances breaks it down by crop.
When bulk becomes a collection
Past a few hundred varieties, the bottleneck stops being storage and becomes retrieval. At that point, a labeled system with 120 slots keeps your most-used varieties at your fingertips while bulk stock stays sealed and out of the way. The rule is simple: the more you plant a variety, the closer it lives to your hands.
Conclusion: Your Seed Collection, Ready for Every Season
The hardest part of seed storage isn't the sorting. It's keeping moisture out and labels on, season after season. Most collections fail on those two points alone.
The WALERICA Seed Storage Organizer Kit solves both. It seals up to 120 varieties in individual vials, includes labels, clips, tweezers, a funnel, and a notebook, and sets up in minutes with no special tools. It's built for home gardeners, greenhouses, and anyone who wants their seed stash ready before the first frost date passes.
Get your WALERICA kit and walk into every planting season organized.
Frequently Asked Questions
What is the best way to organize seeds?
The best system combines physical storage with a tracking method. Sort seeds by plant type or planting date, store them in airtight containers in a cool, dry place, and keep a written or digital log of variety names and purchase dates. A kit with individual vials and labels, like the WALERICA Seed Storage Organizer Kit, makes this easier because each variety gets its own labeled container. The key is consistency: pick one system and stick with it every season.
How should seeds be stored to maintain germination rates?
Seeds stay viable longest when stored in airtight containers at consistent cool temperatures and low humidity. A desiccant packet inside each container absorbs moisture that would otherwise shorten seed viability. Keep containers out of direct sunlight and away from temperature swings, like garages that freeze in winter. Most vegetable seeds can maintain good germination under these conditions, though some varieties last longer. Check stored seeds with a germination test before each planting season.
Should seeds be organized by planting date or plant type?
It depends on how you garden. If you start seeds indoors on a schedule, organizing by planting date relative to your last frost date helps you grab what you need quickly. If you grow a wide variety of vegetables, flowers, and herbs, sorting by plant type (annuals, perennials, vegetables, herbs) makes browsing easier. Many gardeners use a hybrid approach: primary sort by plant type, then note the recommended starting window on each label.
How do you keep track of seed expiration dates?
Write the purchase date directly on each seed packet or vial label when you file it. Then log that date in a seed inventory tracker, whether a notebook or spreadsheet. Before each planting season, review your inventory and flag older seeds for a germination test. Seeds past their prime often still sprout, just at lower rates, so test before discarding. A simple paper test can give you a rough germination percentage.
