

Conservar Semillas Huerto con Humedad Alta: Guía 2026
Table of Contents
- Por Qué la Humedad Alta Arruina tus Semillas y Cómo Detectarlo
- How to Dry Seeds for Storage: Métodos de Secado Paso a Paso
- Best Containers for Seed Storage: Vidrio, Papel o Plástico
- Long Term Seed Storage Tips: Cómo Mantener la Viabilidad por Años
- Desecantes y Gel de Sílice: Tu Aliado Contra la Humedad Ambiental
- Soluciones DIY y Pruebas Caseras de Viabilidad
- Cómo Gestionar Hongos y Patógenos en Semillas Húmedas
- Conclusion
- Frequently Asked Questions
Last Updated: September 13, 2026
Por Qué la Humedad Alta Arruina tus Semillas y Cómo Detectarlo
Seed viability drops fast when moisture climbs. The biggest threat to a stored collection is not age but humidity, which destroys seeds long before their natural lifespan ends. For anyone trying to conservar semillas huerto humedad alta, understanding why moisture is the enemy comes first. This guide from Moderno Top Shop covers drying, containers, desiccants, and the fixes that keep a collection alive.
Seed viability is the percentage of seeds in a batch that germinate under favorable conditions. In high humidity, seeds absorb water from the air, enzymes wake prematurely, and respiration burns the energy reserves needed to sprout. Mold and fungal pathogens follow.
Señales de Semillas Dañadas por Humedad
Moisture damage shows warning signs before germination fails completely, and catching them early lets you rescue part of a batch.
- Seeds clump together or feel sticky instead of flowing freely
- A musty or sour smell when you open the container
- Visible fuzz, discoloration, or dark spots on the seed coat
- Seeds that crumble or crack under light pressure
- A germination test showing weak, pale, or slow-growing seedlings
A common mistake is assuming seeds are fine because they look dry. Moisture damage often starts inside the seed, where you cannot see it. If your storage area feels damp, assume the seeds are absorbing that moisture.
How to Dry Seeds for Storage: Métodos de Secado Paso a Paso
Drying seeds properly before storage is the step most gardeners rush, and it decides whether a collection survives. The goal is internal moisture below 10 percent, without cooking the seed.
- Harvest seeds only when the pods or fruit are fully mature and dry on the plant.
- Spread seeds in a single layer on a screen, paper plate, or newspaper.
- Keep them in a warm, well-ventilated spot away from direct sun for one to two weeks.
- Stir or turn the seeds daily so all sides dry evenly.
- Test for readiness by bending a seed; it should snap, not bend.
- Move seeds into labeled envelopes only after they are fully dry.
Rushing this step traps residual moisture inside the container, which is worse than leaving seeds out. Many growers dry for a full two weeks even when seeds feel dry after one.
Secado al Aire vs Secado con Desecantes
Air drying works in dry climates but struggles in high humidity. Desiccant drying pulls moisture out faster and more completely, which matters in a humid environment.
| Method | Best For | Time Needed | Risk |
|---|---|---|---|
| Air drying | Dry climates, large batches | 1-2 weeks | Slow in humid air |
| Desiccant drying | Humid climates, small batches | 3-7 days | Over-drying if left too long |
| Oven drying | Emergency only | Hours | Kills seed embryos |
Desiccant drying uses silica gel or a similar material to absorb moisture from the air around the seeds. It is the more reliable choice when ambient humidity stays high. Never use an oven; the heat destroys the embryo even at low settings.
Best Containers for Seed Storage: Vidrio, Papel o Plástico
The best container is an airtight glass jar with a gasket seal: glass does not absorb moisture and the seal blocks humid air. Paper envelopes breathe, which is fine short-term but dangerous for long-term storage in a humid climate.
Contenedores Herméticos y Frascos de Vidrio
A hermetic container seals completely, preventing air and moisture exchange. A glass jar with a rubber gasket and clamp lid is the standard. Plastic can work, but many containers are slightly permeable over time and some release vapors that harm seeds.
A practical system pairs a glass jar with individual paper envelopes inside it: the envelopes keep varieties separated and labeled, while the jar provides the moisture barrier. This is the design behind the WALERICA Seed Storage Organizer Kit from Moderno Top Shop, which holds up to 120 labeled varieties in a water-resistant case with envelopes, labels, and tools included.

Long Term Seed Storage Tips: Cómo Mantener la Viabilidad por Años
Long-term viability depends on three variables: moisture, temperature, and consistency. Get all three right and many orthodox seeds stay viable for years.
- Keep stored seeds in a cool, dark place with stable temperatures
- Avoid kitchens, garages, and sheds where temperature swings are common
- Store jars away from floor level, where damp air settles
- Check seals and desiccant packs every few months
- Re-test germination before each planting season
Temperature swings are the quiet killer. Every warm spell wakes the seed's metabolism and burns stored energy. A cool, stable closet beats a warm shelf every time.
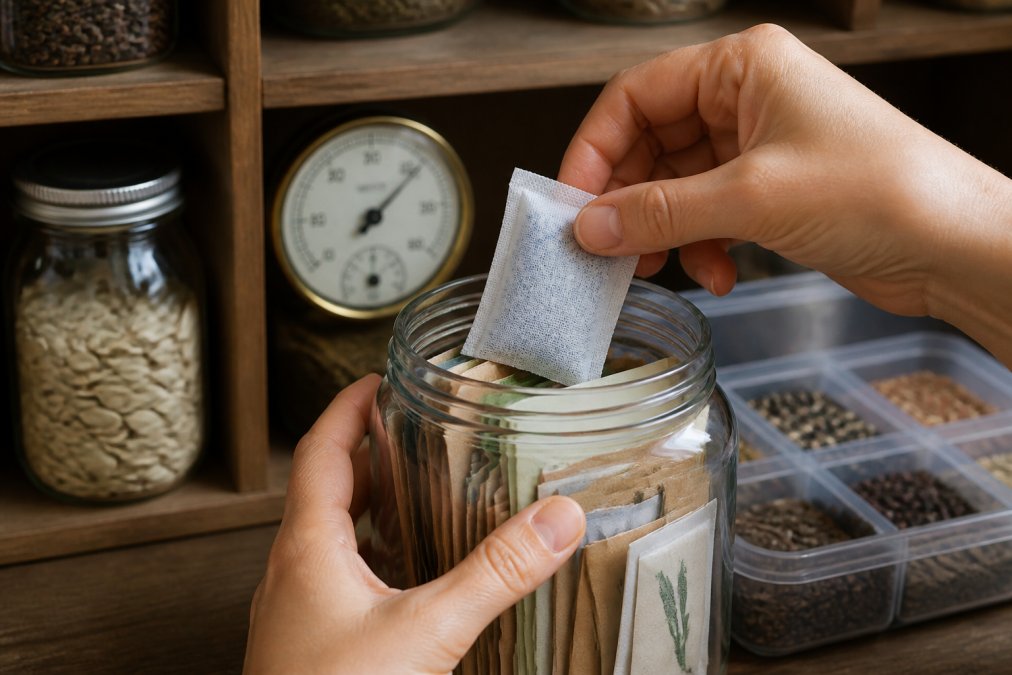
Desecantes y Gel de Sílice: Tu Aliado Contra la Humedad Ambiental
A desiccant is a hygroscopic material that pulls water vapor out of the air inside a sealed container, lowering the relative humidity around your seeds. Silica gel is the most common option: cheap, reusable, and easy to find in shoeboxes, electronics packaging, and vitamin bottles. Other desiccants include activated clay, molecular sieve, and calcium chloride, but silica gel is the safest default because it will not release liquid brine if oversaturated.
How Much Desiccant to Use
There is no universal ratio, but a common pattern among seed savers is roughly 1 to 2 grams of fresh silica gel per pint jar holding a few dozen packets. The goal is not zero moisture, that can crack seed coats and kill embryos, but low, stable relative humidity inside the jar. A small hygrometer gives you a real number instead of a guess.
Recharging Silica Gel
Silica gel changes color as it saturates: indicator beads shift from orange to green, or blue to pink, depending on the formulation. When the color changes, the gel is spent and needs drying out:
- Spread the beads in a single layer on a baking sheet.
- Warm them in an oven at roughly 200 to 250 degrees Fahrenheit for one to two hours.
- Let them cool completely in a sealed container before returning them to the jar.
Do not microwave silica gel packets, the paper can scorch and beads can crack. Do not reuse torn packets; loose beads are a choking hazard and can scratch seed coats.
Not All Seeds Tolerate the Same Humidity
This is where a humid-climate storage plan succeeds or fails. Different botanical families have different safe moisture targets:
- Orthodox seeds, tomatoes, peppers, beans, brassicas, most grains, tolerate drying to low moisture (often cited as 5 to 8 percent) and store for years in a sealed jar with desiccant.
- Intermediate seeds, some citrus and a few tropical trees, tolerate moderate drying but not the deep dry-down that orthodox seeds handle.
- Recalcitrant seeds, avocado, mango, oak, chestnut, and many tropical fruits, cannot be dried below roughly 30 to 40 percent moisture without dying. These will not survive a silica gel jar at all and need a different strategy entirely.
If you save seed from a humid garden, identify which category your seeds fall into before sealing anything. Storing recalcitrant seeds in a desiccant jar is one of the fastest ways to kill them.
Desiccant Alternatives Worth Knowing
Beyond silica gel, two household options work as natural desiccants in a pinch:
- Uncooked rice, absorbs modest amounts of moisture when held in a breathable cloth pouch. It is weaker than silica gel and needs replacing more often, but it is free and always on hand.
- Wood ash, traditionally used in humid regions to keep stored seed dry. It is alkaline, so keep it in a separate pouch and never let it contact the seeds directly.
Neither matches silica gel in a truly humid climate, but both are legitimate backups when commercial desiccant is unavailable.
Soluciones DIY y Pruebas Caseras de Viabilidad
You do not need a lab to know whether stored seeds survived a humid season. Two cheap tests, one for viability, one for contamination, tell you most of what you need before committing garden space.
The Paper Towel Germination Test
- Count out ten seeds from the batch you want to test.
- Place them between two damp, not soaking, paper towels.
- Slide the towels into a sealed plastic bag.
- Keep the bag warm, around room temperature, out of direct sun.
- Check daily and count how many seeds sprout within 7 to 10 days.
If fewer than half sprout, the batch is losing viability and should be used soon or replaced. If eight or more sprout, it is still strong. The test costs nothing and prevents wasted planting space.
The Float Test (A Quick Screen, Not a Verdict)
Drop seeds into a glass of water. Seeds that sink are usually denser and more likely viable; floaters often have hollow interiors from moisture damage or insect feeding. The float test is a fast screen, not a replacement for germination testing, some good seeds float, and some dead seeds sink.
DIY Dehumidification Beyond Silica Gel
- Reuse silica gel packets from shoeboxes, electronics, and supplement bottles.
- Use uncooked rice in a breathable cloth pouch as a moisture absorber.
- Use dry wood ash in a separate pouch, a traditional humid-climate trick.
- Store jars inside a larger sealed bin with a desiccant pack at the bottom, creating a double barrier against ambient humidity.
- Add a small hygrometer to the bin so you can see the actual relative humidity instead of guessing.
Catching Mold Early, The Step Most Guides Skip
Mold is the direct consequence of storing seeds above safe moisture levels, and it spreads from packet to packet inside a sealed jar. The trick is catching it before it is visible on the seed coat.
Early warning signs to watch for during your monthly jar checks:
- A faint musty or earthy smell when you open the lid, this often appears days before visible growth.
- A slight clumping of seeds that were previously free-flowing.
- A dull, cloudy film on the inside of the jar or on the envelopes.
- Tiny white threads at the base of the seeds, visible under a bright light.
If you find mold:
- Isolate the affected batch immediately, do not open it near other jars.
- Discard any seeds with visible growth. Do not try to salvage them for planting; the pathogens often survive on the seed coat and will attack the seedling.
- Inspect every neighboring jar for the same early signs.
- Recharge or replace the desiccant in any jar that showed symptoms.
- Improve airflow in the storage area and lower the ambient humidity if possible.
Inspect stored jars every few weeks during humid months. Catching a problem at the smell stage saves the rest of the collection; catching it at the visible-fuzz stage usually means losing the batch.
Cómo Gestionar Hongos y Patógenos en Semillas Húmedas
Fungal growth is the direct consequence of storing seeds above safe moisture levels. Once mold appears, the batch is compromised and can spread to healthy seeds in the same container.
Prevention is the whole strategy: dry seeds fully, seal them in airtight containers, and keep a desiccant present. If you spot mold, isolate that batch immediately and discard any seeds with visible growth. Do not salvage moldy seeds for planting; the pathogens often survive on the seed coat and will attack the seedling.
Conclusion
High humidity is the hardest challenge for anyone storing seeds, but it is manageable with the right drying, sealing, and desiccant routine. The real difficulty is doing it consistently across dozens of varieties without losing track of what you have.
Moderno Top Shop built the WALERICA Seed Storage Organizer Kit to solve exactly that problem. It holds up to 120 labeled varieties, includes envelopes, labels, and essential tools, and its water-resistant case keeps seeds protected in humid conditions. Setup takes minutes, and everything you need comes in the box.
Get your WALERICA kit from Moderno Top Shop and keep every variety labeled, dry, and ready for the next planting season.
Frequently Asked Questions
¿Qué porcentaje de humedad se necesita para conservar las semillas?
Para conservar semillas por largos periodos, la humedad relativa del aire debe estar por debajo del 50%, y el contenido de humedad interno de la semilla debe ser inferior al 10%. Un higrómetro económico te permite monitorear estos niveles. Si vives en un clima tropical o húmedo, usa desecantes como gel de sílice dentro de un recipiente hermético para mantener la humedad residual baja. Las semillas ortodoxas toleran bien la deshidratación, pero por encima del 12% de humedad interna los hongos y patógenos proliferan rápidamente.
¿Cómo afecta la humedad alta a la germinación de las semillas?
La humedad alta acelera el metabolismo de la semilla, agotando sus reservas de energía antes de que la plantes. También favorece el crecimiento de hongos y patógenos que pudren el embrión. Como resultado, el vigor y la tasa de germinación caen drásticamente. Una semilla almacenada al 15% de humedad puede perder viabilidad en pocos meses, mientras que la misma semilla guardada por debajo del 8% se mantiene viable durante años. El secado adecuado antes del almacenamiento es clave para evitar este deterioro.
¿Puedo usar sobres de gel de sílice para proteger las semillas de la humedad?
Sí, el gel de sílice es un desecante eficaz y económico. Coloca uno o dos sobres pequeños dentro del recipiente hermético junto con las semillas, sin que entren en contacto directo con ellas. El gel absorbe la humedad ambiental y mantiene el interior seco. Reemplaza los sobres cuando las perlas cambien de color o cada 3-6 meses en climas muy húmedos. Combínalo con un frasco de vidrio sellado para mejores resultados en almacenaje a largo plazo.
¿Cuáles son los mejores recipientes herméticos para almacenar semillas de huerto?
Los frascos de vidrio con tapa de rosca y sello de goma son la mejor opción porque son herméticos, no retienen olores y permiten ver el contenido. Los recipientes de plástico grado alimenticio con cierre de silicón también funcionan bien. Evita las bolsas de papel y las cajas de cartón, que absorben la humedad ambiental. Para organizar muchas variedades, un sistema con sobres etiquetados dentro de un contenedor estanco mantiene todo protegido, identificado y listo para sembrar.
