

How to Dry and Store Garden Seeds: 2026 Guide
Table of Contents
- Why Proper Seed Storage Matters More Than You Think
- How to Dry Garden Seeds Before Storage
- Best Containers for Seed Storage: What Works and What Fails
- Step-by-Step: How to Store Garden Seeds Correctly
- Long Term Seed Storage Tips for Maximum Viability
- Seed Viability Testing: How to Check if Seeds Are Still Good
- Common Seed Storage Mistakes and How to Avoid Them
- Conclusion: Build Your Seed-Saving System Today
- Frequently Asked Questions
Last Updated: September 9, 2026
Why Proper Seed Storage Matters More Than You Think
Learning how to conserve garden seeds correctly is the difference between a thriving garden next spring and a disappointing tray of empty pots. Seed storage is a race against time, moisture, and temperature: poor conditions force a seed to burn through its finite energy prematurely, leaving nothing for germination.

Losing a seed variety to mold, pests, or rot means losing genetics you may have nurtured for years, especially with open-pollinated or heirloom varieties.
Proper storage preserves germination rates, protects against pests, and saves you money season after season. Below, we'll walk through the complete process, from drying to long-term storage, and show you exactly how to protect your investment.
How to Dry Garden Seeds Before Storage
The single most important step in learning how to dry garden seeds for storage is removing enough moisture to prevent mold and fungal growth, but not so much that you damage the embryo inside. Seeds that go into storage with excess moisture will sweat inside their container, creating condensation that invites decay.
The drying process starts at harvest. Spread seeds on a coffee filter, paper plate, or fine mesh screen in a single layer. Leave them in a warm, dry, well-ventilated area out of direct sunlight for one to three weeks, depending on the crop. Tomato seeds benefit from a fermentation step first, while bean and pea seeds dry quickly in a week.
A reliable test: seeds should snap or crack when bent, not flex. If they bend without breaking, they need more time. This simple check prevents the two most common storage failures: sealing seeds too wet, which causes mold, or overdrying, which can induce dormancy issues in some varieties.
Best Containers for Seed Storage: What Works and What Fails
Choosing the best containers for seed storage comes down to one principle: airtight beats breathable for long-term preservation. Paper envelopes and bags are fine for short-term organization, but they exchange moisture freely with the air. Glass jars with rubber gaskets, metal tins, and rigid plastic containers create a stable environment.
The failure point for most containers is the seal. A jar that looks closed but leaks air will slowly equalize with the humidity of the room. For this reason, seed storage guidance from the University of California Agriculture and Natural Resources emphasizes keeping seeds in a cool, dry place with stable conditions, which means the container must protect against fluctuating humidity.
What fails consistently? Ziploc bags that aren't fully pressed closed, cardboard boxes, and any container stored above the stove or near a window. Heat and light accelerate aging.
Step-by-Step: How to Store Garden Seeds Correctly
Now for the core question: how to store garden seeds correctly in a way that maximizes viability. Follow these steps in order.
- Confirm seeds are fully dry. Use the snap test described earlier. If you live in a humid climate, consider adding a desiccant packet (silica gel) to the container to absorb residual moisture.
- Choose your container. Glass canning jars, metal tins, or high-quality plastic organizers with tight seals all work. Avoid containers that have held strong-smelling foods, as odors can permeate seeds.
- Add a desiccant. A food-safe silica gel packet helps maintain low humidity inside the container. This is especially critical in coastal or subtropical regions.
- Label everything. Write the crop variety, the date of harvest, and any relevant notes like days to maturity on each packet or vial. This step is non-negotiable for collections over a dozen varieties.
- Seal and store in a cool, dark place. A basement shelf, a closet on an interior wall, or the back of a refrigerator works best. Consistent temperatures between 32°F and 50°F are ideal, but consistency matters more than the exact number.
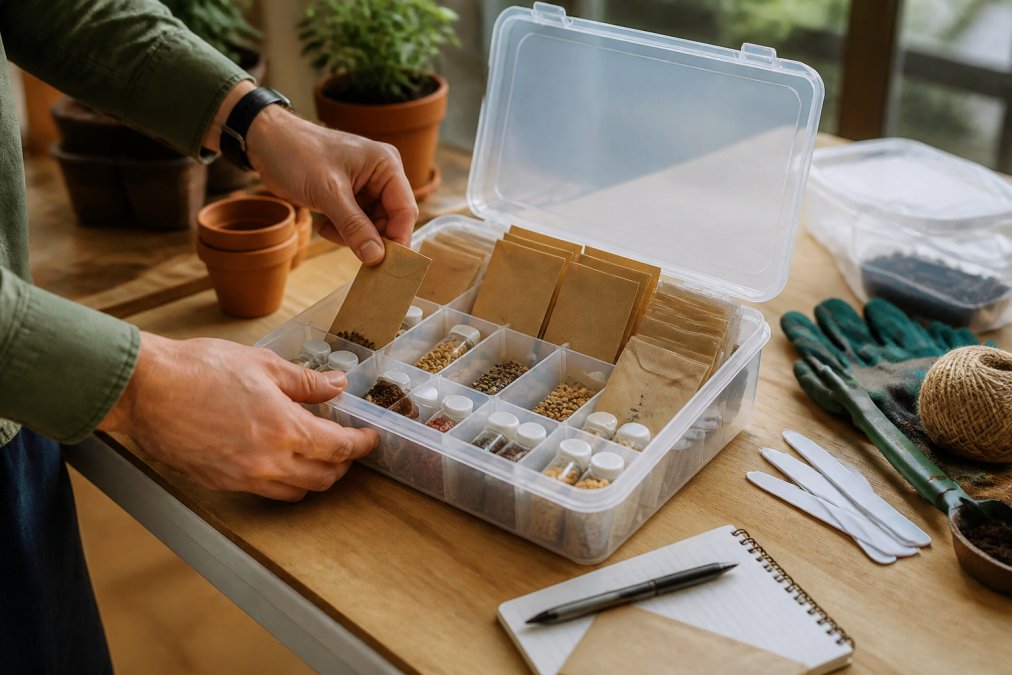
The WALERICA Seed Storage Kit from Moderno Top Shop simplifies this entire process. It holds up to 120 individual vials, includes labels and envelopes, and features a water-resistant design that protects against accidental spills. Setup takes minutes, and the clear case makes finding a specific variety effortless.
Long Term Seed Storage Tips for Maximum Viability
For gardeners serious about preserving rare or open-pollinated varieties, long term seed storage tips go beyond the basics of a cool, dry cabinet. The goal is to slow the seed's metabolic activity to a near standstill. But not all seeds respond the same way: a one-size-fits-all approach is why many gardeners lose their Allium seeds while their tomato seeds stay viable for a decade.
The refrigerator is your best ally for multi-year storage. Place sealed containers in the main body of the fridge, not the door where temperatures fluctuate. Before opening a refrigerated container, let it warm to room temperature for several hours to prevent condensation.
Seeds fall into two broad categories: orthodox and recalcitrant. Orthodox seeds (tomatoes, peppers, beans, lettuce, most annuals) tolerate drying and freezing well. Recalcitrant seeds (many tree nuts, some tropical fruits) die if dried below a certain threshold. For the home vegetable garden, nearly everything you grow is orthodox.
Within orthodox seeds, the key variable is oil content. High-oil seeds, such as brassicas, cucurbits, and alliums, oxidize faster than starchy seeds like beans and peas. Oxidation turns oils rancid and is accelerated by heat and light, which is why onion seeds may last only one to two years while bean seeds remain viable for five.
For high-oil seeds, the freezer is a better long-term option than the refrigerator. At 0°F, oxidation slows to a near halt. Dry the seeds thoroughly, seal them in an airtight glass jar with a silica gel packet, and place the jar in the freezer. When you need seeds, let the jar warm to room temperature for 24 hours without opening, take out only what you need, and return it to the freezer immediately.
Different crops have different lifespans under identical conditions. Here is a practical breakdown by botanical family:
- Alliaceae (onions, leeks, chives): 1-2 years. These are the shortest-lived seeds in the home garden. Always plant fresh seed and never rely on year-old onion seed without a germination test.
- Apiaceae (carrots, parsley, dill): 2-3 years. These seeds have a hard outer coat and benefit from a longer drying period before storage.
- Brassicaceae (cabbage, broccoli, kale, radish): 4-5 years. High oil content, but the seed coat is tough enough to protect the embryo if kept cool.
- Cucurbitaceae (squash, cucumber, melon): 5-6 years. Large seeds with a thick coat; they store well but are prone to mold if not dried below 8% moisture.
- Fabaceae (beans, peas): 3-4 years. Lower oil content makes them more forgiving, but they are the most susceptible to weevil infestation.
- Solanaceae (tomatoes, peppers, eggplant): 5-7 years. Tomato seeds are famously long-lived; pepper seeds are slightly shorter but still reliable for half a decade.
Store seeds in smaller batches so you only expose a portion to the air when planting. This is especially important for freezer storage, where every open-and-close cycle introduces warm, humid air.
For gardeners without freezer space, a cool basement or interior closet below 60°F still gives respectable results. Every 10°F drop in temperature doubles the storage life of a seed: a seed stored at 70°F might last two years, while the same seed at 40°F can last eight.
Seed Viability Testing: How to Check if Seeds Are Still Good
Seed viability testing is a simple process that saves you from wasting a planting season on dead seeds. The standard method is the germination test, which you can do indoors in about a week.
Dampen a paper towel, place ten seeds on it, fold it over, and put it in a plastic bag. Keep the bag in a warm spot, around 70°F to 75°F. Check after seven days and count how many seeds sprouted. If eight out of ten germinate, your seeds are in excellent shape. Five or fewer means you should sow more densely or order fresh seed.
A quicker alternative for larger seeds is the water test, though it is less reliable. Drop seeds into a glass of water. Seeds that sink are likely viable; seeds that float may be hollow or damaged. This method works best as a preliminary screen, not a definitive answer, since some viable seeds naturally float.
Common Seed Storage Mistakes and How to Avoid Them
Even experienced gardeners make errors that shorten seed life. The most common mistake is storing seeds that aren't fully dry, which leads to mold and rot inside sealed containers. Always err on the side of drying longer.
A second frequent error is ignoring pest prevention. Stored grain weevils, bean weevils, and Indian meal moths can devastate a seed collection in weeks. The larvae tunnel into the seed embryo, consuming the energy reserves your seeds need to germinate, and a single infested batch can contaminate an entire storage container.
Most generalist guides stop at 'keep pests away,' but the specific protocol matters. The most reliable home method is a two-step freeze treatment:
- Seal the seeds in an airtight container, a glass jar or a heavy-duty freezer bag works best. This prevents moisture from reaching the seeds during the process.
- Place the container in the freezer at 0°F or below for 48 hours. This kills adult insects, eggs, and larvae. The USDA's Agricultural Research Service has long used sub-zero freezing as a standard quarantine method for seed collections.
- Remove the container and let it warm to room temperature for 24 hours without opening it. This step is critical. If you open the container while the seeds are still cold, condensation will form on the seed surface, adding moisture that invites mold.
- Return the container to the freezer for another 48 hours. A double freeze cycle catches any insects that survived the first round as eggs that were in a dormant state.
This method works for beans, peas, corn, and most other garden seeds, provided they are thoroughly dry first (moisture content below 8%). Freezing wet seeds will rupture cell walls and kill the embryo.
For gardeners who prefer a non-freezing approach, diatomaceous earth is a mechanical option. A thin layer (about 1/4 inch) at the bottom of a sealed container abrades the exoskeletons of emerging insects, causing them to dehydrate. It is food-safe and does not affect seed viability, but it adds bulk and makes it harder to see your inventory at a glance.
A third, often-overlooked mistake is storing seeds near pantry goods. Flour, rice, and dried pasta are common sources of grain weevils that will migrate into your seed collection if stored on the same shelf. Keep your seed storage area physically separate from your food pantry.
Finally, poor labeling creates chaos. A collection of unlabeled packets is nearly useless when spring arrives. The USDA's guide on seed storage and viability reinforces that proper identification, including the harvest date, is fundamental to managing a seed bank effectively. Take the time to label every envelope and vial when you store it, not when you need it.
| Mistake | Consequence | Fix |
|---|---|---|
| Storing seeds too moist | Mold, rot, total loss | Dry until seeds snap; add silica gel |
| Using paper envelopes long term | Moisture exchange, reduced viability | Switch to airtight glass or plastic containers |
| Skipping the double-freeze treatment | Insect larvae survive and destroy seeds | Freeze for 48 hours, warm, freeze again for 48 hours |
| Storing seeds next to pantry goods | Cross-infestation from flour or grain weevils | Keep seed storage separate from food storage |
| No labels on containers | Disorganized, unusable collection | Label variety and harvest date immediately |
Conclusion: Build Your Seed-Saving System Today
Building a reliable seed storage system takes one afternoon but pays dividends for years. Start by drying your seeds properly, invest in airtight containers, and label everything at harvest time. Testing germination rates each winter keeps your collection honest and your garden productive.
The right tools make this system effortless. The WALERICA Seed Storage Kit from Moderno Top Shop brings everything together in one water-resistant case, with 120 vials, labels, and envelopes included. It is a solution for gardeners who want organization without the hassle. As noted by seed-saving resources from the Seed Savers Exchange, a systematic approach protects the diversity in your garden for years to come.
Frequently Asked Questions
How long do garden seeds remain viable in storage?
Most common vegetable seeds stay viable for 2 to 5 years when stored correctly, but this varies by type. Onions and parsnips last only 1 to 2 years, while tomatoes, peppers, and cucumbers can remain viable for 5 to 10 years. The key factors are consistent low temperature, low humidity, and darkness. Properly dried seeds stored in an airtight container in a cool place will always outlast seeds kept in a warm, humid kitchen drawer.
Do seeds need to be completely dried before storage?
Yes, excess moisture is the number one killer of stored seeds. Seeds that are stored too wet can mold or germinate prematurely inside the container. The general rule is to dry seeds until they snap or crack when bent, rather than flexing. A simple test is to place seeds in a sealed jar with a desiccant like silica gel for a week. If no condensation appears on the glass, the seeds are dry enough for long-term storage.
What are the signs that stored seeds are no longer viable?
Visual signs like mold, discoloration, or insect damage are obvious red flags. However, seeds can look perfect and still be dead. The most reliable method is a germination test. Place 10 seeds on a damp paper towel, roll it up, and keep it in a warm spot for 7 to 10 days. If fewer than 6 seeds sprout, the batch has poor germination rates and you should sow the rest more thickly or replace them.
What is the ideal temperature and humidity for storing seeds?
The ideal environment for storing garden seeds is a cool, dark, and dry place. Aim for a temperature between 32°F and 41°F (0°C to 5°C) and a relative humidity below 50%. A refrigerator is a great option for long-term seed storage. For every 10°F drop in temperature, seed lifespan roughly doubles. Just ensure seeds are in an airtight container so they don't absorb moisture from the fridge.
Seed storage is a simple discipline with outsized rewards. A few hours of careful drying and organizing now means a garden full of vigorous, healthy plants next season. Get your WALERICA kit and start your seed-saving system today.
