
How to Dry Heirloom Seeds for Storage: A Complete Guide
Table of Contents
- Why Drying Heirloom Seeds Properly Matters
- Wet vs. Dry Processing: Which Method Fits Your Seeds
- Step-by-Step: How to Harvest and Air-Dry Seed Pods
- Cleaning Seeds: Removing Chaff and Debris
- How to Test Seed Viability and Moisture Before Storing
- Best Containers for Seed Storage and Long Term Seed Storage Tips
- Troubleshooting: Mold, Pests, and Dormancy Issues
- Frequently Asked Questions
Last Updated: September 30, 2026
Why Drying Heirloom Seeds Properly Matters
Learning how to dry heirloom seeds for storage is the difference between a collection that lasts for years and one that turns moldy by spring, so it pays to know how to dry heirloom seeds properly. Heirloom seeds carry genetics you cannot buy again, so drying them right protects that investment.
Here is the core problem. Seeds stay alive only when their moisture content drops low enough to pause growth. Leave too much water inside a seed, and it will rot, sprout early, or grow mold in the jar. Dry it too fast in direct sunlight, and the embryo dies.
The fix takes patience, not money.
Most guides skip the details that actually matter. They tell you to "let seeds dry" without explaining how to test whether they are ready. Below, we break down each step, from harvest to sealed jar, so nothing gets left to guesswork.
Wet vs. Dry Processing: Which Method Fits Your Seeds
The right processing method depends on what kind of seed you are saving. Some seeds come out of fleshy fruit and need wet processing. Others dry on the plant and only need dry processing.

Wet processing suits tomatoes, cucumbers, melons, and peppers. You scoop the seeds out with the pulp, ferment them in water for a few days, then rinse and dry. The fermentation process breaks down the gel sack around each seed and kills off some surface diseases.
Dry processing works for beans, peas, lettuce, flowers, and most herbs. The seed pods dry on the plant or on a screen, and you simply shell or shake the seeds loose.
Here is a quick way to decide:
| Seed Type | Method | Why |
|---|---|---|
| Tomatoes, cucumbers, melons | Wet processing | Gel sack needs fermentation |
| Beans, peas, lettuce | Dry processing | Seeds dry inside the pod |
| Peppers, eggplant | Either method | Works well both ways |
| Flowers, herbs | Dry processing | Pods shatter when dry |
A common mistake is wet-processing seeds that should stay dry. Beans and peas ferment poorly, and the extra moisture invites mold.
Step-by-Step: How to Harvest and Air-Dry Seed Pods
Harvest seeds on a dry, sunny day, ideally in the afternoon after any morning dew has burned off. Wet pods invite mold before drying even begins.
Follow these steps:
- Pick pods and fruits when they are fully ripe, not before. Color and firmness tell you the seeds inside are mature.
- For dry pods, wait until they rattle or turn brown on the plant.
- For fleshy fruits, scoop seeds and pulp into a jar of water.
- Spread wet-processed seeds on a paper towel or screen to air-dry.
- Spread dry pods on a wire screen in a shaded, well-ventilated room.
- Stir or turn the seeds daily so air reaches every side.
- Keep them out of direct sunlight, which can cook and kill the embryo.
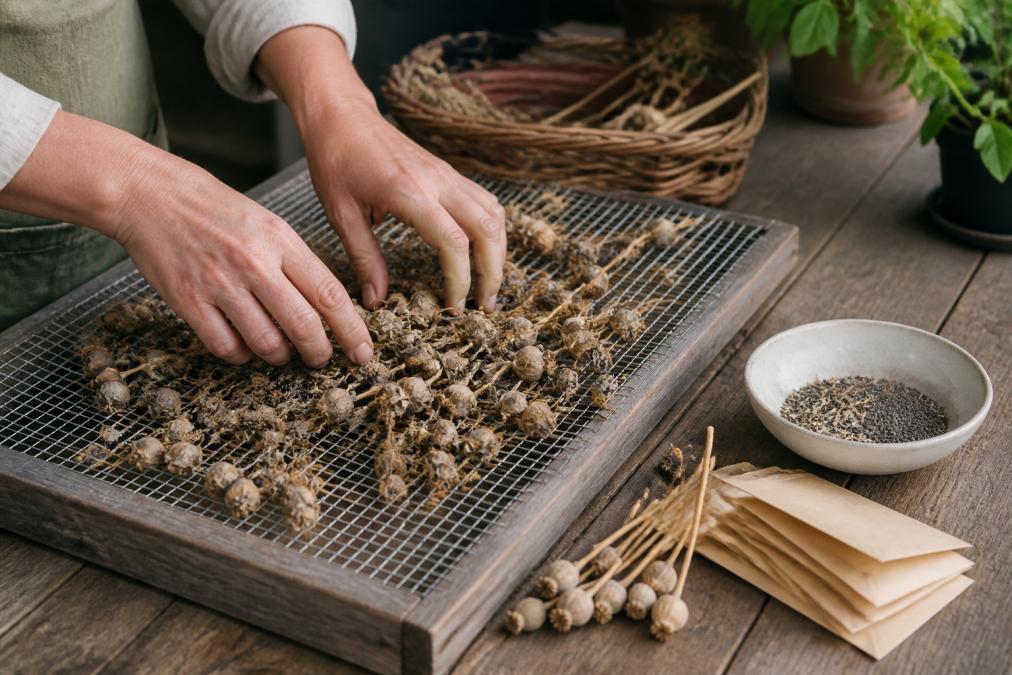
Air-drying usually takes one to three weeks, depending on humidity. In a damp climate, it can take longer. Be patient here. Rushing this stage is the number one reason seeds spoil later.
Cleaning Seeds: Removing Chaff and Debris
Cleaning removes chaff, stems, and dust so only healthy seeds go into storage. Chaff holds moisture and can carry mold spores into your containers.
The classic method is winnowing. Pour seeds from one bowl to another in front of a gentle fan or breeze. The light chaff blows away while the heavier seeds drop straight down.
For smaller batches, try these options:
WALERICA Seed Storage Organizer Kit →
- Pick out debris by hand over a white plate
- Shake seeds through a kitchen sieve to separate sizes
- Rub dry pods between your palms to release seeds, then blow off the husks
After cleaning, spread the seeds out again for a few more days. Handling them can push surface moisture back to the top. This second drying pass catches that.
Label each batch as you clean it. Once seeds are loose, it is nearly impossible to tell one cultivar from another by sight. Write the variety name and the harvest year on a paper envelope right away.
How to Test Seed Viability and Moisture Before Storing
Testing before storage is the step most gardeners rush, and it is the step that decides whether your collection survives the winter. You need to answer two questions: Is the seed dry enough to seal? And is it alive enough to bother storing?
The snap test, done properly. This is the fastest field check and it works best on large seeds like beans, peas, corn, and squash. Pick a representative seed, not the biggest one in the batch. Bend it between your thumb and forefinger. A fully dry seed snaps with an audible crack and breaks cleanly. A seed that bends, dents, or squishes still holds internal moisture. Test three or four seeds from different parts of the batch, because seeds near the edge of a drying screen dry faster than seeds in the center.
The salt test for moisture content. For a more precise read without a meter, use plain table salt. Put a tablespoon of salt in a small glass jar, add a few seeds, seal it, and shake. If the salt clumps or sticks to the glass after a few minutes, the seeds are still releasing moisture. If the salt stays loose and free-flowing, the seeds are dry enough for airtight storage. This is a common home-scale proxy for the moisture-content check that commercial seed savers run with a meter.
The moisture meter check. If you store seeds in bulk, a basic moisture meter gives a clearer reading. Most practitioners aim for a seed moisture content in the low single digits before sealing. Without a meter, the snap test and salt test together give you a reliable go/no-go answer.
Viability testing. The float test is quick but imperfect: drop seeds in water, and seeds that sink are usually viable while floaters are often hollow. It is unreliable for small or porous seeds, so treat it as a rough screen only. For a stronger answer, run a germination test. Count out ten seeds, place them on a damp paper towel, roll it up, and keep it warm, around room temperature, for seven to fourteen days. Count how many sprout. Ten out of ten is excellent; five out of ten means you should plant more thickly or replace the batch. Record the result on the envelope so you know next spring what to expect.
Dormancy: the test that fools people. Some heirloom seeds will not sprout in a germination test no matter how viable they are, because they carry a built-in delay called dormancy.
Best Containers for Seed Storage and Long Term Seed Storage Tips
The best container for seed storage is airtight, dark, and kept in a cool, dry place. Light, heat, and humidity are the three enemies of seed viability, and each one has a specific countermeasure.
Troubleshooting: Mold, Pests, and Dormancy Issues
Three problems show up most often in stored seed collections: mold, pests, and dormancy. Each has a clear fix.
A quick reference for common issues:
| Problem | Likely Cause | Fix |
|---|---|---|
| Mold on seeds | Moisture in container | Re-dry and replace desiccant |
| Holes in seeds | Weevil or moth larvae | Freeze before storing |
| Seeds will not sprout | Dormancy | Cold-stratify before planting |
| Seeds bend, not snap | Not fully dry | Air-dry longer |
Frequently Asked Questions
How do you know when heirloom seeds are dry enough to store?
Seeds are ready when they snap cleanly instead of bending or squishing. Try the visual snap test: press a seed between your fingers or bite it gently. If it cracks, moisture content is low enough for storage. If it dents or feels rubbery, give it more air-drying time. Large seeds like beans and corn take longer than small seeds like lettuce. In humid conditions, add a desiccant pack to the drying container and check again in a few days.
Can you dry seeds in the sun or should they be kept in the shade?
Keep them in the shade. Direct sunlight overheats seeds and can damage the embryo inside, lowering germination rate. Spread seeds on a screen or paper in a warm, dry room with good airflow, ideally between 60 and 75 degrees Fahrenheit with low humidity. A fan on low setting speeds drying without cooking the seeds. If you must dry outdoors, use a covered porch or shaded area and bring seeds inside before evening dew.
What is the best container for storing dried heirloom seeds?
Airtight containers work best: glass jars with rubber gaskets, metal tins, or sealed plastic vials. Paper envelopes alone let humidity in, so use them inside a larger airtight box. The WALERICA Seed Storage Organizer Kit holds 120 labeled vials and includes a water-resistant outer box, which keeps varieties separated and protected. Add a silica gel desiccant pack to each container and store in a cool, dark place away from direct sunlight.
How long do heirloom seeds last if dried and stored properly?
Most properly dried heirloom seeds stay viable for 3 to 5 years in cool, dry conditions. Some varieties, like beans, tomatoes, and peppers, can last 5 to 10 years when kept airtight with a desiccant at temperatures under 60 degrees Fahrenheit. Onion, parsnip, and leek seeds lose viability faster, often within 1 to 2 years. Label each container with the cultivar name and harvest year, then test germination rate every couple of seasons to track shelf life.
